For the Reef Power RP-M Startup Guide, Click Here
Getting Started:
Getting Started with Your Photon Light:
- Connect the power supply to your light first. Once connected, plug the power supply into the wall outlet.
- Upon powering on, the light will initialize by cycling through each color channel. Simultaneously, the fans will activate, and the indicator LED will display various colors before settling on a flashing blue.
- Before configuring the light’s wifi connection, ensure the Reef Nexus app is downloaded on your device and that you’re logged into your account.
- To add a new device in the app, tap the ‘+’ icon located at the top right corner, then choose “Reef Breeders.”
- Once you’re set, click “Ready.”
- Leave the app and navigate to your phone’s wifi settings. Look for the network named “ReefBreeders-Light_XXXXXX” and establish a connection. Upon a successful connection, a notification will guide you back to the Reef Nexus app. If this doesn’t occur, manually launch the Reef Nexus app.
- In the app, you’ll be prompted to join your 2.4GHz wifi network. Input your password (remember it’s case-sensitive and can have special characters). A show password option ensures accuracy.
- A solid green LED indicates a successful connection. You can then name your light and adjust colors using the available sliders. If the light responds, it confirms a successful connection.
- New lights might initiate an over-the-air (OTA) update upon first connection. A flashing purple LED denotes this process. Refrain from unplugging during this phase. Post-update, the light will reboot and reconnect to your wifi automatically.
- You’re now ready to schedule your light. Choose from preset or custom options. We suggest starting with the “soft coral” setting, which peaks at 30% blue. Transition to “mixed reef” over several weeks.
Troubleshooting Tips:
- Light remains solid blue and won’t connect: A solid blue LED indicates a direct connection to your phone. If previously paired but not connected to your home network, navigate to phone’s wifi settings. Choose the light’s network and select “forget this network.” Now, restart the Reef Nexus app and follow the connection steps. Ensure you connect to the light’s network only when prompted.
- Difficulty connecting to the internet: Ensure you’re linking to a 2.4GHz network. Try resetting your router and light by unplugging for 30 seconds. Verify your network password’s accuracy, and watch out for similar-looking characters. Restarting your phone might help. As a final measure, consider reinstalling the Reef Nexus app.
- Light activates at unintended times: If your light’s schedule seems offset, access the Reef Nexus app’s settings. Temporarily change the time zone, save, then revert to the correct zone.
- Missing remote/Remote not functioning post Reef Nexus kit installation: The Photon V2 Pro uses smartphones for control. Installing the Reef Nexus kit deactivates the original circuit board, rendering the remote useless.
- Connecting Photon V2 Pro to an Apex: Install the Apex VDM integration kit. Note: While the apex kit is active, the Reef Nexus app won’t function.
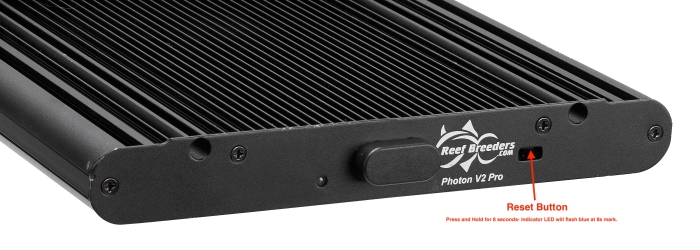
- Reset Button Location: In most cases, you won’t need a reset. The button is reachable via the endcap—a small gold button within a square cutout. New lights include a key for pressing, though a flat-head screwdriver works too. Gentle pressure is sufficient.
Important Notes: The Photon V2 Pro or the Reef Nexus kit requires an Android or iOS smartphone. Additionally, a password-protected 2.4GHz wifi network is necessary. Most routers offer either 2.4GHz or both 2.4GHz and 5GHz frequencies. If you’re on a 5GHz-exclusive network, adjust your router settings or consult your ISP. You’ll need an internet connection to utilize these lights. If unavailable, a secondary mobile hotspot can serve as a setup alternative, like in remote areas or at tradeshows.
IMPORTANT- the reset button is activated by pressing gently UPWARDS- do NOT press inwards on the button. This may damage your reset button.
