Getting Started: Install your Reef Power Pump in your aquarium, then plug it in- in this exact order:
1: Plug the pump into the controller.
2: Plug the power supply into the controller.
3: Plug the power supply into the wall outlet.
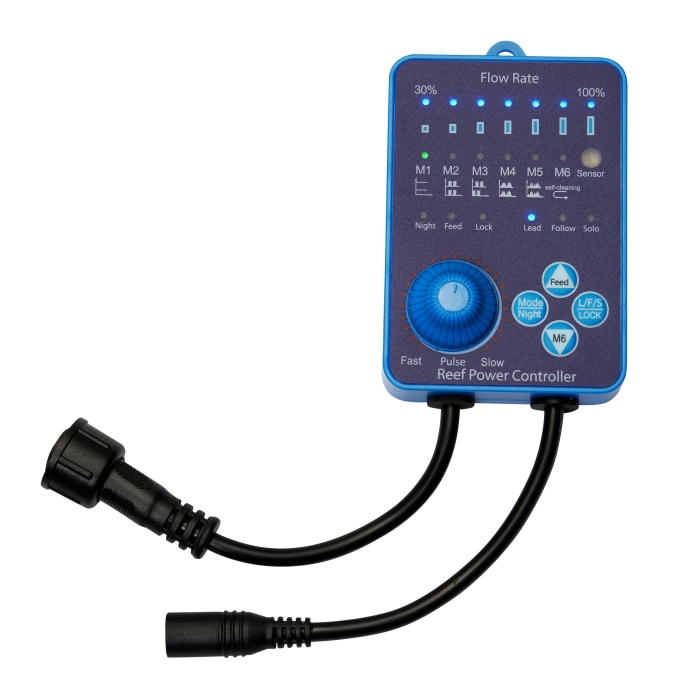
Operating your Reef Power Controller:
At the top, the flow rate is displayed, ranging from a minimum of 30% power to a maximum of 100% power in 7 increments, representing an increase of 10% from the minimum output. ie, 2 LEDs lit is roughly 50% power.
Below the flow rate, the pumps current mode is displayed. To change modes, press the MODE/NIGHT button.
To enter Mode 6, press and HOLD the Down Arrow/M6 Button.
To adjust the flow Rate, Press the UP arrow to increase, and DOWN arrow to decrease it.
To adjust how fast the pump pulses (applies to M2, M3, M4, and M5 ONLY) turn the Pulse Knob. FAST pulses vary faster- ie 1 second at full power, 1 second at minimum power. SLOW pulses vary slower, ie 15 seconds at full power, 15 seconds at minimum power.
Mode 1: Constant flow. Pulse adjustment has no effect. Pump runs constantly at your set flow rate.
Mode 2: Single Pump Pulse- Pulse adjustment changes how fast or slow the pump pulses.
Mode 3: Anti-Sync Pulse- This works with individual pumps just like the single pump pulse. However in Lead/Follow mode, the Lead Pump will alternatively pulse against the Follow pump. ie, Lead Pump On, Follow Pump off and vice versa.
With More than 2 pumps, each pump pulses in alternating orders. 1 Pump 1 on, Pump 2 off, Pump 3 on, Pump 4 off etc.
The Pulse speed will affect this mode as well.
Mode 4: LPS Mode. This is a randomized flow pattern- it will vary from constant on, to pulsing, etc. Changes in this mode tend to take longer vs. Mode 5. The pulse knob increases (fast) or decreases (slow) the rate of mode changes
Mode 5: SPS Mode. This is also a randomized flow pattern, however it tends to change faster are more erratically than Mode 4, making it more ideal for high flow SPS corals. The pulse knob increases (fast) or decreases (slow) the rate of mode changes
Mode 6: Reverse Mode. Just like Mode 1, the pulse knob has no effect. To enter this mode, press and hold the down arrow key. The pump will spin backwards, cleaning detritus and algal buildup from the impeller, and the area directly below the pump. NOTE: Do not run the pump in reverse mode for longer than 60 seconds.
Feed Mode: The pump will shut off for 10 minutes, then resume its program. Press and HOLD the Up/Feed Button to toggle feed mode on/off.
Night Mode: The pump will enter Mode 1 at Minimum flow when the controller is in a sufficiently dark area. There is a light sensor in the controller (behind the opaque window marked “Light”). Please note that in order for this to work, the pump must be in an are that is well lit during the day, and has full darkness at night. If the controller is in a dark cabinet during the day- night mode will be active at undesirable hours.
Lead/Follow/Solo Modes: To toggle your pump into either Lead, Follow, or solo, press the L/F/S / LOCK button.
Lead: This pump will wirelessly link to any nearby Reef Power Controllers (within 6 feet) and control pumps in follow mode. When you press a button on the lead controller, the follow controller will respond to that change simultaneously.
Follow: This pump will react to changes made on the Lead controller. For example in Mode 3- the pump will run in an anti-sync pulse with the lead controller. The Follow pump will also enter feed mode at the same time as the lead controller. NOTE: Pumps in Follow mode will NOT respond to button presses other than the L/F/S button.
Solo: The pump will run on it’s own, independent of any nearby Lead/Follow Pumps
Lock Mode: To Lock your controller and prevent someone from making unwanted adjustments, press and HOLD the L/F/S / LOCK button. To exit, press and hold the button again.
Replacing Your Impeller/Bushings

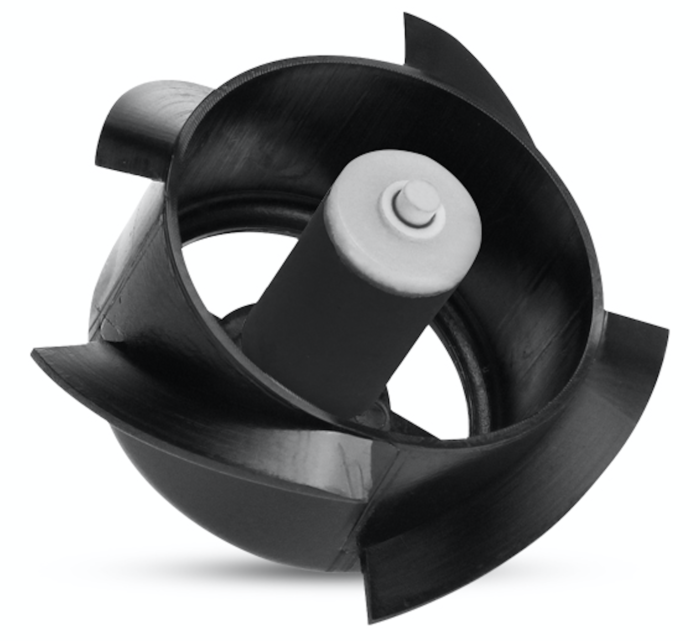
In some cases your impeller and bushings may need to be replaced. They can occasionally move out of alignment, causing undesired noise levels. If that is the case, please contact us for replacement impeller sets within our 18 month warranty. Impellers are available for purchase outside of the warranty period.
- Unplug your pump from power and remove it from your aquarium.
- Rotate the front of the pump counter-clockwise to release the front housing, then pull it apart from the rear housing.
- Remove the impeller by pulling it out.
- Remove the bushings (white ceramic inner ring with black rubber outer ring). This is best done with a small screw-driver. Insert the tip into the center of the bushing, and gently tilt it sideways to release. There are 2 bushings. One is located inside the motor, and one is located in the front housing. Be sure to replace both of these.
- Insert the new bushings. Simply push the first bushing into the front housing, making sure that it is fully seated and level. The rear bushing can be inserted by first placing it on the end of the impeller shaft, then inserting the impeller shaft into the motor.
- Align the front housing with the impeller shaft and the locking tabs, then rotate it clockwise to lock it into place.
- Re-install your pump in your aquarium.